The workspace of your application is the same as the physical one. You want it to have all the items you need, minus the ones that get in your way. So when it comes to working with Microsoft Office 2016, customize your ribbon. How to modify the ribbon menu of windows and office. How to modify the ribbon menu of windows and office. Since its introduction in Office 2007, I have been struggling to come to terms with it. I much preferred Office 2000/2003's method of "hiding" tools you don't use often... Read More
In Office 2016 applications, including Word, Excel, PowerPoint, Outlook, and OneNote, you access and customize the ribbon and menu items in the same way. What differs are the customization options available. inside each application.
To hide or show the ribbon, click Ribbon display options Button at the top right of your app. You then have three options for your ribbon display:

To access the ribbon customization options, select File> Options> Customize the ribbon . Each application's settings will display options in the same format with commands on the left and the content of the ribbon on the right.
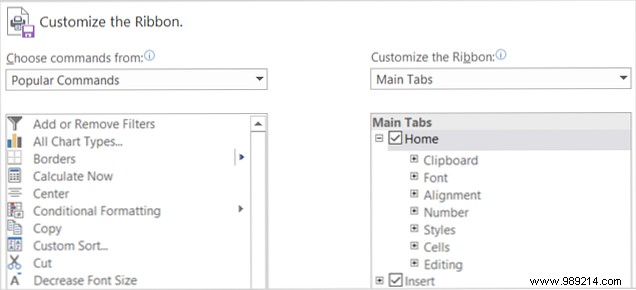
Ribbon contents listed under Customize Ribbon on the right side include check boxes and plus signs. Check boxes indicate what is contained on the ribbon, and plus signs allow you to expand and view the included items and actions. For example, in PowerPoint the Home tab currently includes the Clipboard command with its available actions.

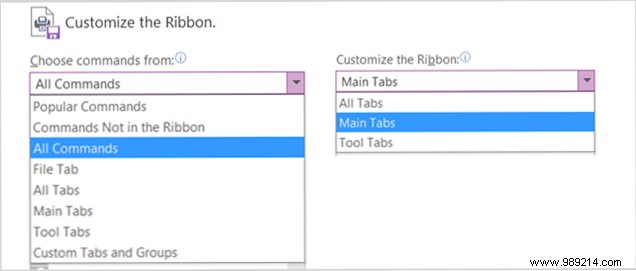
To customize the content of the ribbon, you'll basically move items between the Choose commands from list on the left side and the Customize the ribbon List on the right side. Start by selecting the list sets from the dropdown boxes on each side.
You can then uncheck any items to the right that you no longer need to display on the ribbon. For example, if you no longer want the Draw tab in OneNote, uncheck the box next to Draw and click OK . For items with plus signs, you can add or remove individual items. So if you prefer to keep the Draw tab in our example, but it should contain all actions except Convert, you can easily remove it. Just select Convert , click the remove button in the middle, and select OK .

Adding commands and tabs to the ribbon is just as simple, but you move items in the opposite direction. First, create a new group within an existing tab or a new tab altogether, using the appropriate button at the bottom.
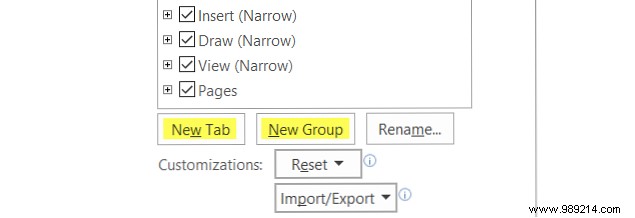
You can rename anything you want, and if you create a group, you can also choose a nifty icon. Then just select the command on the left side, click Add button in the center, and press OK When you're done.

Now that you know how to access, add, and remove items from the ribbon How to Customize Microsoft Office 2016 for Your Needs How to Customize Microsoft Office 2016 for Your Needs Default settings rarely meet the needs of all users. Here are five easy tweaks that let you tailor Microsoft Office 2016 to your preferences. Read More Maybe you never have a need for the Mailings tab, the Review tab in Excel, or the History tab in OneNote. Or maybe you want to keep and customize those tabs to fit your daily needs. Here are some examples of how efficient and effective your tape can do.
Using the arrows or the context menu on the Customize the ribbon In this section, you can quickly move items up and down to determine their location on the ribbon. The tab at the top of the list will be displayed on the far left of the ribbon, and subsequent tabs will continue to the right the way you naturally read.
Try putting the tab you use the most first, the next one second, and so on. You may not use the Home tab on a regular basis in Excel, but you do use the Formulas tab constantly. So, move the House tab down and the Formulas tab up You can also rearrange commands within tabs, giving you even more flexibility.
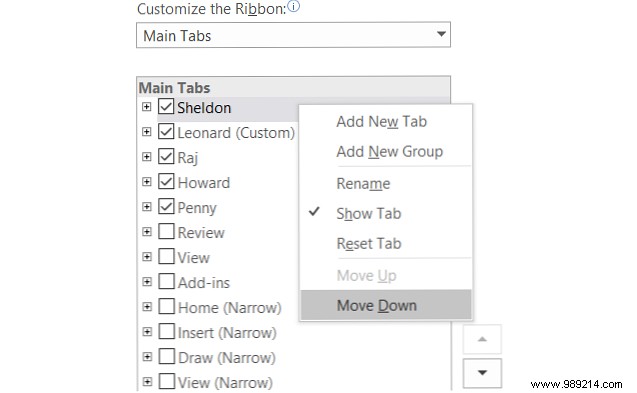
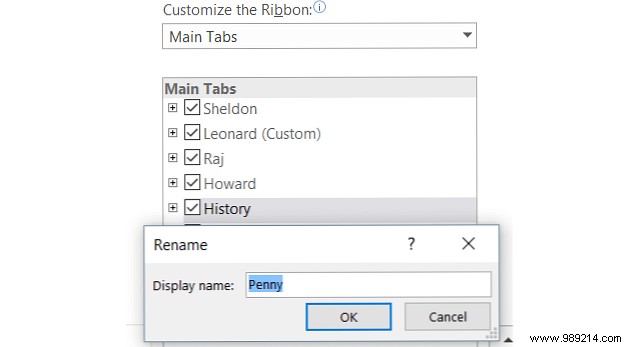
You can not only rename the custom tabs and groups you create, but also the built-in ones. Let's say you want to change the tab labels to the names of the main characters in The Big Bang Theory , No problem. Sheldon, Leonard, Raj, Howard and Penny are just a click away.
Simply select the item from the Customize Ribbon list, click Rename button at the bottom, name it whatever you want, and finish by pressing OK button.
Believe it or not, you can create your own ribbon with the exact tabs and commands you want very easily. For example, if you only use the drawing commands in OneNote, with just a couple of others, this can be achieved.
First, create a New Tab and then create new groups within it if you like or just add individual commands. Remember that you can add commands from other tabs, as well as those not currently displayed on the ribbon. Next, rearrange the commands in the order you prefer using the arrows, and then rename them to whatever you prefer.
When you're done, uncheck the rest of the tabs you no longer need and click OK . Your end result is your own tab with the commands you need, all named whatever you want.

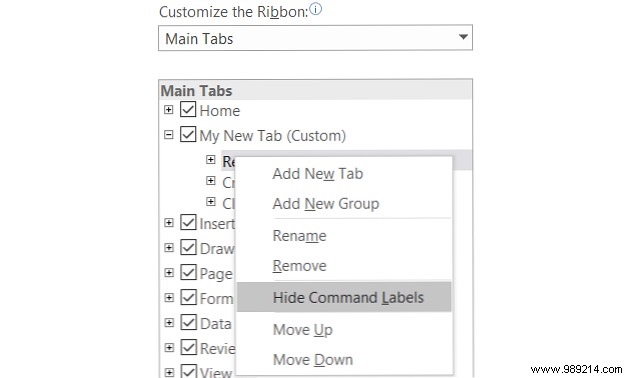
If you're a visual thinker or just prefer icons to text on your ribbon, you can easily make this happen. Although you can't hide command text within main tabs, you can for groups you think contain commands.
For example, if you are using PowerPoint, create a New Group , either within a new tab or an existing one, by clicking the corresponding buttons at the bottom to configure it. Then add the commands you want to the group and rename and rearrange them as you like. When you're done, right-click the new group you created and select Hide Command Labels . Note that this can only be done with commands added to custom groups you create.
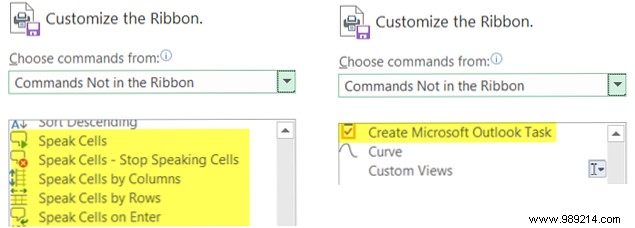
In the Customize the ribbon box, inside the Choose commands from section on the left, select Commands not on the ribbon from the dropdown list. These are the commands you are not currently using on the ribbon and you may be surprised at the options available.
If you want to use audio, you can add voice commands to hear cell text in your Excel spreadsheet or selected text in your Word document spoken aloud. If you use Outlook to manage your tasks, you can add a command to create a task from your ribbon with a single click. If you want to include a quick drawing with the mouse, you can add the Scribble command. These are just a few examples of the hidden options available. 8 Things You Can Do In The Office You Never Thought Of 8 Things You Can Do In The Office You Never Thought Of Microsoft Office flips the Pareto principle on its head:80% of its users Only use 20% of the features. It's time to rediscover Microsoft Office features you never considered. We've compiled eight incredibly useful productivity... Read More
If you spend valuable time customizing your ribbon, you can save your settings by exporting them to a file. Select the Import and export button and then Export all customizations. . In the next pop-up you can choose a location and rename the file. Then click Save .
To import your saved customizations, select the Import and export button and then Import customization file . Then navigate to the file location in the pop-up window and click Open . You will need to confirm that you want to replace your current settings with the ones in the file.
In case you want to reset the settings to default, you can click on Reset button. Then choose between Reset only the selected ribbon tab or Reset all customizations and click OK .

Depending on how much customization you're planning, it may take a bit of time. However, the end result will give you the exact elements you need and use in your ribbon and menu, while removing those you don't. The ability to create an effective workspace 10 Simple Office 2013 Tips That Will Make You More Productive 10 Simple Office 2013 Tips That Will Make You More Productive MS Office skills remain rooted in the top common skills employers seek. So be smarter with these ten easy Office 2013 tips and get more free time at the water cooler. Read More Sometimes it's as easy as printing, other times you need special tools. Enter this converter guide. Read More
If you have additional suggestions for creative ribbon and menu customizations, please share them in the comments below.